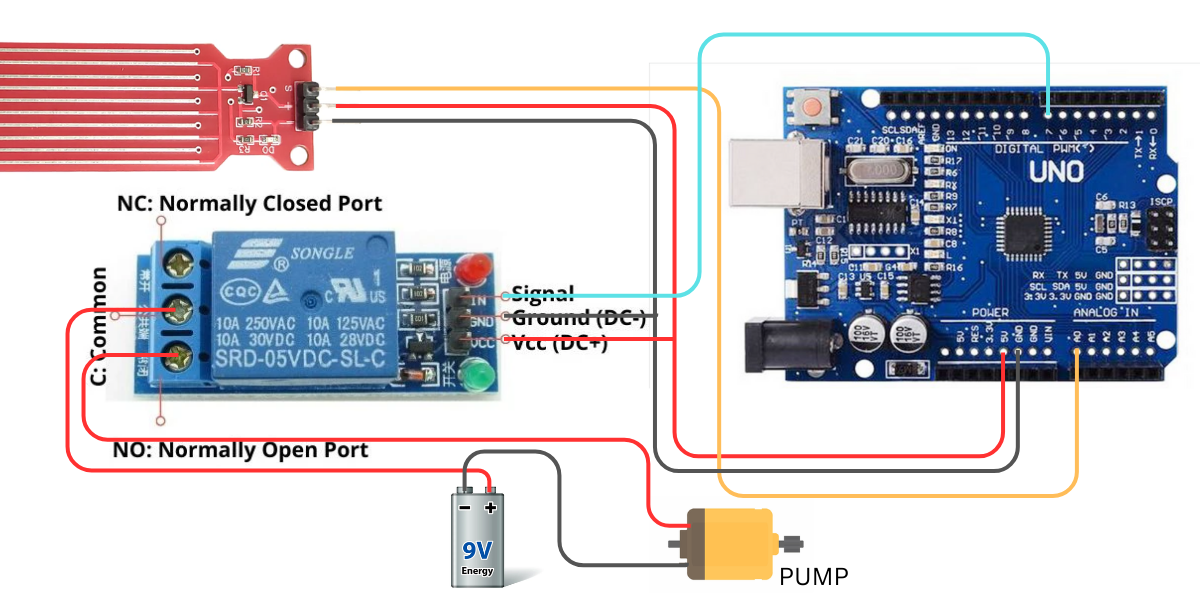
Project using an Arduino UNO, a water level sensor, a relay module, a water pump, and a 9V battery. Here’s how the components are connected:
This setup automates water level maintenance in an aquarium using an Arduino UNO, a relay module, a water pump, and a water level sensor.
Key Components & Their Roles
- Arduino UNO – Microcontroller that processes signals from the water level sensor.
- Water Level Sensor – Detects water levels and sends signals to the Arduino.
- Relay Module – Controls the water pump operation based on sensor readings.
- Water Pump – Refills water when levels drop below the threshold.
- 9V Battery – Provides power to the pump.
Working Principle
- The water level sensor continuously monitors the water level in the aquarium.
- When the water level drops below a set threshold, the sensor sends a signal to the Arduino UNO.
- The Arduino UNO activates the relay module, which turns on the water pump.
- The water pump refills the aquarium until the sensor detects the desired water level.
- Once the water reaches the required level, the relay module turns off the pump, preventing overflow.
Wiring Connections
| Component | Arduino UNO Pin |
|---|---|
| Water Level Sensor (Signal) | A0 |
| Water Level Sensor (VCC) | 5V |
| Water Level Sensor (GND) | GND |
| Relay Module (Signal) | D7 |
| Relay Module (VCC) | 5V |
| Relay Module (GND) | GND |
| Pump (Positive) | Relay NO (Normally Open) |
| Pump (Negative) | Relay Common |
| Battery (Positive) | Relay NC (Normally Closed) |
Code Example (Arduino)
/ Pin definitions
#define WATER_LEVEL_PIN A0
#define RELAY_PIN 7

// Thresholds for water level control (adjust based on calibration)
const int LOW_WATER_THRESHOLD = 180;  // Water level value indicating low level
const int HIGH_WATER_THRESHOLD = 434; // Water level value indicating sufficient level

void setup() {
  Serial.begin(9600);

  // Set up the relay pin as output
  pinMode(RELAY_PIN, OUTPUT);
  digitalWrite(RELAY_PIN, LOW);  // Ensure the pump is off at the start

  Serial.println("Aquarium Water Level Control System Initialized");
}

void loop() {
  // Read the water level sensor value
  int waterLevelValue = analogRead(WATER_LEVEL_PIN);

  // Print the sensor reading to the Serial Monitor for debugging
  Serial.print("Water Level Value: ");
  Serial.println(waterLevelValue);

  // Check if the water level is below the low threshold
  if (waterLevelValue <= LOW_WATER_THRESHOLD) {
    // Turn on the relay to activate the water pump
    digitalWrite(RELAY_PIN, HIGH);
    Serial.println("Water level low! Pump ON.");
  }
  // Check if the water level is above the high threshold
  else if (waterLevelValue >= HIGH_WATER_THRESHOLD) {
    // Turn off the relay to stop the water pump
    digitalWrite(RELAY_PIN, LOW);
    Serial.println("Water level sufficient. Pump OFF.");
  }

  // Delay for stability before the next reading
  delay(1000);
}
Benefits of This System
✅ Automated Water Control – No need for manual refilling.
✅ Prevents Water Shortage – Keeps aquatic life safe and healthy.
✅ Customizable Thresholds – Adjust sensor sensitivity as needed.
✅ Easy to Implement – Uses basic electronics for practical application.


Leave a Reply